
All of the customisable branding features within our various templated apps is listed below.


Kent House Business Centre
3rd Floor, Kent House
81 Station Road
Ashford
TN23 1PP

PageSuite (India) Pvt. Ltd
91 Springboard
Pune,
Maharashtra 411006
India

All of the customisable branding features within our various templated apps is listed below.
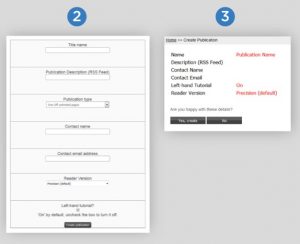
To find out how to create an edition, either watch the support video below or follow the steps below.
How to Create a New Publication Video
Step by Step Guide: How to Create a New Publication Video

To find out how to create an edition, either watch the support video below or follow the steps below.
How to Create an Edition Video
Step by Step Guide: How to Create an Edition Video
After confirming those details, the next step will be to upload your PDFs.

1. Select ‘Upload this edition’s pages’.

2. Login to your FTP client with the FTP details provided and upload your PDFs. You can send the FTP details via email by entering an email address in the box below.


 3. There are various FTP clients that can be downloaded for free, we recommend: FileZilla, Win SCP, Cyberduck (mac only) and Fetch.4.
The next step will be to process your edition.


The next step will be to process your edition.
Quick Schedule

Schedule


This video shows how to find a publication and goes through the quick link options.
We hope you found this video useful, if not please contact our support team via the form below.
To find out how to search for an edition within the HTML5 reader, either watch the support video below or follow the steps at the bottom of the page.
We hope you found this video useful, if not please contact our support team via the form at the bottom of the page.
Step by Step Guide: Searching for an Edition
After logging into the PageSuite portal, click on the publications tab then select view publications.
From here you can start typing the name of the publication you want into the search bar. You should then see the list diminish.
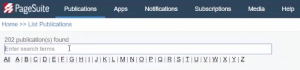
After you have found the publication, hover over it and click on the manage option.
This will take you to the publication. From here you can click on the View Latest Edition option or access all editions via the View All Editions option.
To find out how to change any icon along the top of the HTML5 reader, either watch the support video below or follow the steps at the bottom of the page.
We hope you found this video useful, if not please contact our support team via the form at the bottom of this page.
Step by Step Guide: Changing an Icon
Within the HTML5 reader, every single icon along the top bar is customisable to match your company branding.
To do this you must initially access the publication you wish to customise.
Then access the publication settings and click on the Top Bar tab.

You will then be able to see the options for Icons and Desktop Icons.

When you expand these headings you will see all of the icons that are available to customisable.
If you already have your image hosted elsewhere, you can directly drop in the URL for that new button.
Alternatively, you can upload your media to PageSuite. After clicking the upload button you will be able to browse your files and select the file you would like to use for the icon.
After the image has been uploaded, click on the one you would like to use, it will turn blue and then click the green ok button.
If you hover over the image you will see a preview appear in the middle of the screen.
After these steps have been completed, scroll to the bottom of the page and click save.
You will notice underneath every icon it shows a recommended size to use, this 64×64 pixels.
To find out what advertising options are available and how to add them into your HTML5 publication, either watch the support video below or follow the steps at the bottom of the page.
We hope you found this video useful, if not please contact our support team via the form at the bottom of this page.
Step by Step Guide: Adding Advertising
After logging into the PageSuite portal, click on the publications tab then select view publications.
Find the publication you would like to add advertising to and click on Publication Settings, then the advertising tab.

It will now display all the different types of advertising that can be added into the publication.
If it’s not checked already, check the “Adverts Enabled” checkbox which can be found on the “Adverts” tab. 
It will now display all the different types of advertising that can be added into the publication.
Options to turn on each different type of advert will appear. Check the “Enable” checkbox next to the advert you wish to switch on. N.B. Article Popover Ads are enabled in the article templates.
 Options to select the advert type will appear. You can only select one type for each advert.
Depending on which advert type you have selected; a series of options will appear. You must complete all required options before you’ll be able to save.

Or…

Or…

After completing the required fields click the “Save” button at the bottom of the page.

If you need to know the required advertising and branding dimensions click here.