In order to edit splash screen settings, you must enable the splash screen by checking the “Enable Splash Screen” checkbox on the Splash Screen settings page.

When this is checked, you will be given the following options:
- Minimum Duration Here you can enter the minimum time (in seconds) that the splash screen should appear for.

- Background Colour in Chrome (and a few other web browsers) you will get a colour swatch next to a textbox.

Clicking this swatch will open up a colour picker similar to this:
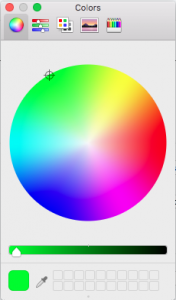
Alternatively, you can enter the hex code for your desired colour. N.B. if you’re using a browser that does not support this colour picker you can use http://www.colorpicker.com/
- High Res Logo

This setting allows you to have a high-resolution custom logo appearing on the splash-screen. High resolution means a large image: we recommend a size of 1200 pixels by 1200 pixels. It has several parts to it:
a. A textbox – Here you can enter a URL (web address) of an image, alternatively selecting a file from one of the following parts will populate this textbox for you.
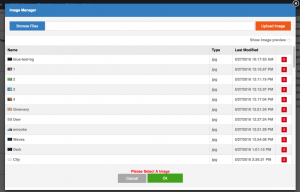
b. Upload Button – Clicking this opens up a modal (pop-up) where you can select from previously uploaded images or upload a new one.
c. Drop Down – This dropdown will contain a list of any image assets associated with your portal account. Click an option to select that image.
Hovering your cursor on the image preview will display a full-size preview of the image.
- Small Logo This setting has several parts to it (see High Res Logo). It allows you to have a smaller logo on smaller screens, we recommend a size of 600 pixels by 600 pixels.

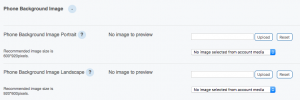
- Phone Background Image

To see phone background image settings click the blue “+” icon next to the title. You should see the following options:
To hide them, simply click the “-“ icon next to the title.
a. Phone Background Image Portrait – This setting has several parts to it (see High Res Logo). It allows you to add an image background to the splash screen on phone devices. We recommend 600-pixel width and 920-pixel height for the portrait version of the background.
b. Phone Background Image Landscape – This setting has several parts to it (see High Res Logo). It allows you to add an image background to the splash screen on phone devices. We recommend 920-pixel width and 600-pixel height for the landscape version of the background.
- Tablet Background Image

To see tablet background image settings, click the blue “+” icon next to the title. You should see the following options:

To hide them, simply click the “-“ icon next to the title.
a. Tablet Background Image Portrait – This setting has several parts to it (see High Res Logo). It allows you to add an image background to the splash screen on tablet devices. We recommend 1536-pixel width and 2048-pixel height for the portrait version of the background.
b. Tablet Background Image Landscape – This setting has several parts to it (see High Res Logo). It allows you to add an image background to the splash screen on tablet devices. We recommend 2048-pixel width and 1536-pixel height for the landscape version of the background.
When you’ve finished editing the settings you wish, click the “Save” button.
N.B. It will not save if there are errors on the page but will let you know if this is the case.
http://origin.media.cdn.pagesuite.com/psapps/images/1/PSLoadingGif_Retina.gif


